Friday, January 28, 2011

LOVE BUG

It's the weekend and we don't have hockey games to go to so that means more time for crafting. I have five female birthdays in February I need to get ready plus some Valentine cookies to make.
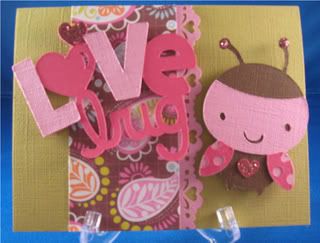
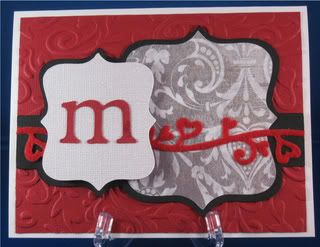
I am really enjoying the challenge blogs I have been finding. There are thousands of creative minds out there churning out fantastic object 'd art every week. I find now it is also a bigger challenge trying to combining challenges to come up with one idea. On this card the colours, the theme and the cartridge were chosen making it so much easier to come up with an idea. I love how it turned out and I hope my great niece will too.
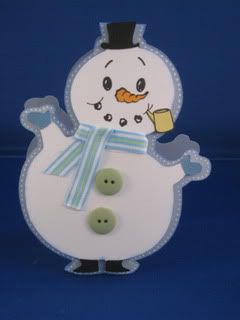
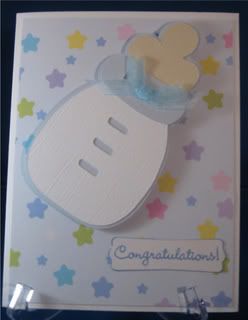
The ladybug and Love Bug title are on page 66 of Create a Critter. Both were cut at 3". I cut the shift layer of the words and cut the "l" and "v" off. The inside of the card has a piece of pattern paper and heart border to match the front.

Details:
Card - A2 Cardstock - Bazzill & Colormates
Pattern Paper - 8x8 Sweet Blooms by Colorbok
Embellishments - Stickles (pink)
Punch - Fiskar heart border
Cartridge - Create a Critter

Challenges:
Wacky Wednesday #23 - brown, green, pink
Cricut Cardz Challenge #59 - child's Valentine card any cartridge
Cricut Cartridge Chaos Challenge #3 - Create a Critter

Enjoy your weekend!!!
Happy Cricut Crafting
Colleen

Thursday, January 27, 2011

CHALLENGES

This project fits the criteria for two challenges this week. Over at Paper Playtime #35 challenge was anything party related. At Scrappy Moms Stamps, Terrific Tuesday the challenge was to use the "Sweethearts" cartridge.
I am so excited!!! A client of my husband gave us hockey tickets to see the Vancouver Canucks play the Calgary Flames on Feb. 12th. This will give us a chance to visit my three nephews and their families. So a party needs favours and chocolate is always a hit.
The mold used to make the pretzel stick topper is by Wilton. I bought everything, including the pretzels, at my local Michael's. I used Light Cocoa candy melts.
The tags were cut using the TAG "feature key" and two hearts shapes (pg 34,35). Both cut at 3". The tag "foundation key" (pg 79) was also cut at 3".
The Hugs & Kisses tag was made using the "cartoche" on page 74. To manipulate the image I used my Gypsy and changed the size of both the width & height to 3.45w by 2.94h. To do that the width and height have to be unlocked by clicking on the chain image. This allows the proportions to be altered. The words Hugs & Kisses on page 36 were cut at 2 1/4". The pink paper on the cartoche was stamped with white Colorbox pigment ink.
The best part about making these was the taste test. Someone had to eat the broken pretzels and leftover chocolate! YUMMY.
Please leave a comment telling me which tag you like best.

Happy Cricut Crafting
Colleen

Monday, January 24, 2011

ORGANIZING CRICUT CARTRIDGES


There are lots of people on the web showing their cartridge storage ideas - here is mine. I use my Gypsy or Design Studio mostly so I don`t use the overlays and books a lot. I store my carts in three plastic storage buckets in alphabetical order. I store the overlays and books in two Sterlite Snap Lid containers. The folders are cut from office file folders - 2 per folder. The labels are made on the computer. I remove the French and German pages from the books so more books fit per container.
I purchase the cute Cricut backpack on wheels so when I teach classes everything fits nicely in there. It holds all my Cricut carts, my Gypsy and all it`s cords, Cricut colors & gel pens and tool kit.
I am still cleaning and re-arranging my studio. My paper mound is the next stop. If you have any helpful ideas please leave a comment.

Happy Cricut Crafting
Colleen

Sunday, January 23, 2011

TIOLET PAPER MINI ALBUM


I am teaching a beginners Cricut class and this is the project this week. These are really fun to create and make great gifts. The flowers, borders and leaves are all from Walk in My Garden. The lettering is Mickey Font. The tab on the inserts is a SU punch.
To squash the TP rolls easily, run them through the Cuttlebug. Cover each roll with a 4" x 6" piece of pattern paper. Using a Cropidile punch two holes close to one edge.Make a cardboard template so each page is the same. Set eyelets and put on binder rings. A Bind it All could also be used with a large O wire.
Select any four flowers and make between 1 1/2" to 2" tall. Numerous layers are required for some of the flowers. Cut a piece of cereal box or chipboard for the back of the flower used for the front cover. This makes it more durable. Ink edges, add gems, buttons and brads. The one inch border flowers and leaves are made by using the Border Feature key.
The verses were printed from the computer and the edges inked. Stamps could also be used. Journaling stamps with handwritten info could also be used. Hope you will give these a try.

Happy Cricut Crafting
Colleen

CRICUT CARDZ CHALLENGE #58

I live in central British Columbia and instead of building this snowman outside I did it from the warmth of my basement studio. We have had a great deal of snow in the last two weeks but fortunately we have a friend that could plow our driveway with his truck. Still trying to shake my cold.
My little friendly snowman is from Stretch Your Imagination. I cut him at 5 1/2" out of white. The blue card base is two shadow images welded together in the hat area. I stamped his face with the largest snowman face from Peachy Keen Stamp set called PK 520 Winter Face Assortment. I also own PK 754 Critter faces and PK 570 Basic Paper Doll Faces.
If you own Paper Doll, Create a Critter or any snowman cartridges (Doodlecharms, Christmas Cheer) you need to check out Peachy Keen Stamps and see all their incredible stamps. So So Cute!
The nose and pipe were stamped again on orange and yellow paper and cut out. The buttons and ribbon scarf added a little texture. The white layer is popped up from the base. I did little dots of white around the entire base. The edges of the snowman and the card base were distressed with blue ink. I think my little great niece will love getting this in the mail.

Happy Cricut Crafting
Colleen

Sunday, January 16, 2011

CRICUT CARDZ CHALLENGE #57

I am battling a sour throat and cough today so not much going on today. Laptops are great, they can come to bed with you! I made this card for my nephew's wife, Michele, who's birthday is in February. That's the good thing about participating in challenges - getting cards made ahead of time.
This is my entry for the red, white & black colour challenge at Cricut Cardz Challenge.


I used my Gypsy to manipulate the Marquee1 shape from Storybook (pg 66). Unlock the width & Height and change to -Large 3.5H 3.25W
Small 2.75H 2.5W
Using Plantin make a rectangle 1H x 5 1/4W. Weld these three shapes together. This makes a one piece mat.
The layers of white bling and pattern paper were cut 1/4" smaller both height and width. The red Pomegranate Bazzill background was embossed with a Sizzix folder from the Floral Flourishs and Vine set. The letter was sized by putting it inside the mat and using the size up button and increasing it until it looked good.


Details:
Card Size - 4 1/4 x 51/2
Cart - Storybook
Card stock - white, pomegranate, white bling Bazzill, Deep Heritage Black colormates
Pattern Paper - Basic Grey Black Tie (Ventana)
Embellishment - Mini felt fusion by Queen & Co.

This was fun and I like the colour scheme
. It is funny how we get stuck in a rut buying the same colours and only working within our comfort zones. Be brave and try a different colour. It is not life threatening, trust me,

Happy Cricut Crafting
Colleen

Friday, January 14, 2011

BABY CARDS

The Children's pastor at our church was looking for someone to make baby cards for the new arrivals. Guess who volunteered! They were fun to make.


This is the kind of project when I love to use my Gypsy. By using the Gypsy or Design Studio you can quickly figure out the number of bottles or rattles that will cut per page. The shadow of the rattle and the band are the same colour, so by arranging them all on the same page on the Gypsy it is easy to be economical with your paper.

Details:
Card Size - 4 1/4 x 5 1/2
Cart - New Arrivals
Base of card - Bazzill
Cricut cuts - Rattle 4'' & Bottle 4" all Bazzill, the top of the rattle - Swiss Dot Bazzill
Punches - SU scallop oval and label
Pattern Paper - unknown, Mat size is 4 x 5 1/4
Ribbon - sheer & gingham
Ink - SU and Chalk


Happy Cricut Crafting
Colleen

Wednesday, January 12, 2011

HOW TO ENTER BLOG CHALLENGES

This week I have been spending a lot of time blog hopping looking for blogs that had challenges on them. After submitting my first ever challenge entry, I was buzzed and left wanting to find out more about the whole process. Then I thought it might be a good topic of a post for those of you that are still "Challenge Newbies".
Each blog usually has a Design Team that post their entries when the challenge is issued as inspiration. Here are a few I found - there are lots more.

Days the challenges are issued:

MONDAY- Fantabulous Cricut deadline is Sunday midnight. Any paper craft item. Prizes are drawn by random.org . The 4 weekly winners are entered for a monthly grand prize.
MONDAY - Paper Playtime deadline is Saturday midnight. Any paper craft item. Prizes are weekly from various sponsors. Winners must have USA mailing address. (Friends or Relatives will come in handy here).
WEDNESDAY - Cricut Cardz Challenge deadline is Monday midnight. Card challenge only. Prizes are drawn by random.org . The 4 weekly winners are entered for a monthly grand prize.
WEDNESDAY - Wacky Wednesday deadline is Monday midnight. Any paper craft item. Prizes are drawn by random.org
FRIDAY - Paper Cutz Challenge deadline Thursday midnight. Any paper craft item. Prizes are drawn by random.org . The 4 weekly winners are entered for a monthly grand prize.

Rules for entry:

Post your picture to your blog or email it to them. On the blogs there is either a "Mister Linky" or "Add your link" blue key to push and then fill in the information. Some have other criteria to follow and it is listed at the bottom of the challenge post.

As people enter their projects a list forms at the bottom of the post. Click on their name and it will take you to their blog. It is a great way to surf and see lots of creative blogs.

Prizes:
Each blog announces the weekly winner on their blog. They do not contact the winner so you have to keep track and then reply with an email.

I hope this takes some of the mystery out of how to post a challenge entry and I want to encourage you to give it a try.

Happy Cricut Crafting
Colleen

Tuesday, January 11, 2011

CRICUT CARDZ CHALLENGE


So far my resolutions are going okay. I have submitted my first challenge entry to Cricut Cardz Challenge. Every Wednesday a new challenge is posted. This past week's challenge was a New Year's card with a clock image from any cartridge. My nephew Mark's birthday is in January so I made this for him. This also helps out on my resolution to get cards out to family & friends on time. His birthday is the 24th. If you look closely I have circled the 24th on the January stamped image.


Details:
Carts - Happily Ever After (clock), Plantin (letters & circles)
Stamps - Close to My Heart (calendar circles) Cloud 9 (inside verse)
Cardstock - Colormates
Pattern paper - Pet stack DCWV
Embossing folder - Clockworks

Hope this inspires you to try a challenge yourself. Wednesday Jan 12th is the next one at Cricut Cardz so check it out. I will post some more challenges links next time.
Happy Cricut Crafting
Colleen

Tuesday, January 4, 2011

HAPPY NEW YEAR 2011

After a long absence I am returning with full enthusiasm and creativity. I hope you and your families enjoyed the Christmas season as much as ours did. My daughter was on my case about my blog and selling my stuff so that is what prompted me to return.

I don't usually make resolutions but this year I did.

1. Make my blog a priority and post regularly
2. Make a project from each of my 73 cartridges
3. Better organize my craft space
4. Enter one challenge a month and post my entry (scary)
5. Get birthday cards to family & friends on time
6. Sell some of my projects

This is a big list of "to do's" but I am going to give it my best shot.

This first project was made for my husband for Christmas. I took an online course through My Creative Classroom to learn more about my Bind it All Machine. I highly recommend this course. By binding only four rings on each edge makes the project both lighter and uses up leftover pieces from other projects. My husband is an awesome photographer and I wanted to make a frame we could hang in our motor home. If this falls off the wall it won't break!

I used six 5 x 7 chipboard pieces and covered them with paper. Bind only on the edges. I choose to cut two of the pictures down to let the pattern paper show and have a space for the two Cricut cuts from Give a Hoot. The backs were inked.(No birds were hurt in the making of this frame.) I have a large collection of feathers. I will be making more of these in different themes, look for further postings.
My next blog will be about things I have done to organize my Bind it All, embossing folders and Cricut books & overlays.


Happy Crafting,
Colleen
 

lawsuit loans